Excel · C# walkthrough
Export application records to Excel
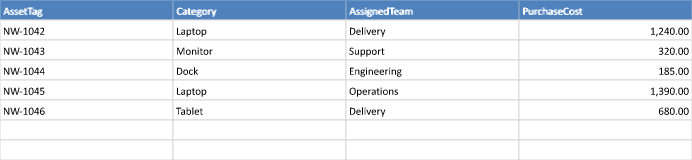
Export application data without writing every cell by hand. A typed asset array becomes an Excel table, with a frozen header and a formatted purchase-cost column.
- Start with
- An array of typed asset records
- Generate
- XLSX
How it works
Define the record shape
Use a small C# type for the fields that belong in the export. Keep unrelated application state out of the record.
Map records through RowsFrom
Pass the array to the fluent sheet builder and add a named, styled table over the generated data.
Finish the worksheet
Set practical widths, freeze the header, and format the cost column before rendering and saving.
The C# source
This is the complete example file used to generate the download. The walkthrough runner creates the output directory and produces the additional previews.
using System.IO;
using OfficeIMO.Drawing;
using OfficeIMO.Excel;
using OfficeIMO.Excel.Fluent;

namespace OfficeIMO.Examples.Showcase.Workflows;

/// <summary>Exports typed application records as a filterable Excel table.</summary>
internal static class ObjectExport {
    private sealed class Asset {
        public string AssetTag { get; init; } = "";
        public string Category { get; init; } = "";
        public string AssignedTeam { get; init; } = "";
        public decimal PurchaseCost { get; init; }
    }

    internal static void Create(string folder) {
        Asset[] assets = {
            new() { AssetTag = "NW-1042", Category = "Laptop", AssignedTeam = "Delivery", PurchaseCost = 1240 },
            new() { AssetTag = "NW-1043", Category = "Monitor", AssignedTeam = "Support", PurchaseCost = 320 },
            new() { AssetTag = "NW-1044", Category = "Dock", AssignedTeam = "Engineering", PurchaseCost = 185 },
            new() { AssetTag = "NW-1045", Category = "Laptop", AssignedTeam = "Operations", PurchaseCost = 1390 },
            new() { AssetTag = "NW-1046", Category = "Tablet", AssignedTeam = "Delivery", PurchaseCost = 680 }
        };
        using ExcelDocument document = ExcelDocument.Create(Path.Combine(folder, "example.xlsx"));
        document.AsFluent()
            .Sheet("Assets", sheet => sheet
                .RowsFrom(assets)
                .Table("Assets", table => table.Style(ExcelTableStyle.TableStyleMedium2))
                .AutoFit(columns: true, rows: false))
            .End();
        ExcelSheet sheet = document.Sheets[0];
        sheet.Freeze(topRows: 1);
        for (int column = 1; column <= 4; column++) sheet.SetColumnWidth(column, 24);
        for (int row = 2; row <= assets.Length + 1; row++) sheet.FormatCell(row, 4, "#,##0.00");
        sheet.Range("A1:D8").ExportImage(OfficeImageExportFormat.Png)
            .Save(Path.Combine(folder, "preview.png"), OfficeImageExportFileConflictPolicy.Replace);
        document.Save();
    }
}
Run it from the source checkout
Clone the OfficeIMO repository and run this command from its root with the .NET 10 SDK. The first run restores the example project's dependencies.
dotnet run --project OfficeIMO.Examples -f net10.0 -- --showcase-workflows --showcase-example excel-object-exportThe files are written to OfficeIMO.Examples/bin/Debug/net10.0/Documents/Workflows/excel-object-export/. To use the example in your application, start with the Excel guide and its package setup.
Downloads and scope
What the preview shows
The linked C# example generates this file. The runner reopens and validates the XLSX. The image is a native rendering of the specified worksheet range.
What to keep in mind
The sample uses five flat records. It is not a benchmark or a demonstration of streaming a large database result.