Excel · C# walkthrough
A project workbook with a summary
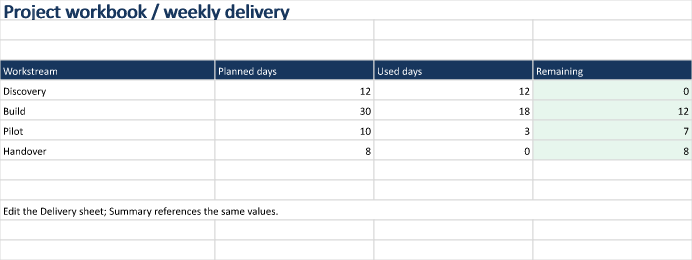
Let one worksheet own the detailed numbers while a second presents the review view. This workbook demonstrates cross-sheet references without manually copying the same figures into two places.
- Start with
- Planned and used days by workstream
- Generate
- XLSX
How it works
Separate detail from presentation
Create Summary first for the opening view, and Delivery for the data table.
Calculate in the owning sheet
Compute remaining days beside each delivery row, then point the summary formulas at those cells.
Keep the detail usable
Add a table and freeze its heading row. Calculate before creating the summary image and saving the workbook.
The C# source
This is the complete example file used to generate the download. The walkthrough runner creates the output directory and produces the additional previews.
using System.IO;
using OfficeIMO.Drawing;
using OfficeIMO.Excel;

namespace OfficeIMO.Examples.Showcase.Workflows;

/// <summary>Separates delivery detail from a summary with cross-sheet formulas.</summary>
internal static class ProjectWorkbook {
    internal static void Create(string folder) {
        using ExcelDocument document = ExcelDocument.Create(Path.Combine(folder, "example.xlsx"));
        ExcelSheet summary = document.AddWorksheet("Summary");
        ExcelSheet delivery = document.AddWorksheet("Delivery");
        summary.MergeRange("A1:D1");
        summary.Cell(1, 1, "Project workbook / weekly delivery");
        summary.CellFontSize(1, 1, 20);
        summary.CellBold(1, 1, true);
        summary.CellFontColor(1, 1, "17365D");
        string[] labels = { "Discovery", "Build", "Pilot", "Handover" };
        string[] headers = { "Workstream", "Planned days", "Used days", "Remaining" };
        for (int column = 0; column < headers.Length; column++) {
            delivery.Cell(1, column + 1, headers[column]);
            summary.Cell(4, column + 1, headers[column]);
            summary.CellBackground(4, column + 1, "17365D");
            summary.CellFontColor(4, column + 1, "FFFFFF");
            summary.SetColumnWidth(column + 1, column == 0 ? 30 : 22);
            delivery.SetColumnWidth(column + 1, column == 0 ? 30 : 22);
        }
        for (int index = 0; index < labels.Length; index++) {
            int row = index + 2;
            delivery.Cell(row, 1, labels[index]);
            delivery.Cell(row, 2, new[] { 12, 30, 10, 8 }[index]);
            delivery.Cell(row, 3, new[] { 12, 18, 3, 0 }[index]);
            delivery.CellFormula(row, 4, $"B{row}-C{row}");
            summary.Cell(index + 5, 1, labels[index]);
            for (int column = 2; column <= 4; column++) {
                string letter = ((char)('A' + column - 1)).ToString();
                summary.CellFormula(index + 5, column, $"'Delivery'!{letter}{row}");
            }
            summary.CellBackground(index + 5, 4, "E7F6ED");
        }
        delivery.AddTable("A1:D5", true, "DeliveryPlan", ExcelTableStyle.TableStyleMedium2);
        delivery.Freeze(topRows: 1);
        summary.MergeRange("A11:D11");
        summary.Cell(11, 1, "Edit the Delivery sheet; Summary references the same values.");
        document.Calculate();
        summary.Range("A1:D13").ExportImage(OfficeImageExportFormat.Png)
            .Save(Path.Combine(folder, "preview.png"), OfficeImageExportFileConflictPolicy.Replace);
        document.Save();
    }
}
Run it from the source checkout
Clone the OfficeIMO repository and run this command from its root with the .NET 10 SDK. The first run restores the example project's dependencies.
dotnet run --project OfficeIMO.Examples -f net10.0 -- --showcase-workflows --showcase-example excel-project-workbookThe files are written to OfficeIMO.Examples/bin/Debug/net10.0/Documents/Workflows/excel-project-workbook/. To use the example in your application, start with the Excel guide and its package setup.
Downloads and scope
What the preview shows
The linked C# example generates this file. The runner reopens and validates the XLSX. The image is a native rendering of the specified worksheet range.
What to keep in mind
The image shows the Summary sheet. Open the XLSX to inspect and edit Delivery; the preview is not an interactive workbook.